Playing Sound Into Microphone To Be Annoying In Voice Chat
Table of Contents
1. Overview
Recently, I've been playing ARC Raiders, and I've grown to love the player interaction in the game. Almost all of them were very nice, and I haven't been betrayed (yet). Some of my favourites are the ones people doing things with the microphone. Some uses it as intended (asking others if they're friendly, coordinating with others, etc), but there were also people playing music into it. I've heard of people using it as a soundboard, ambushing players with melee whilst playing Pokemon encounter music. I wanted to do this in a way that is both reliable, and quickly accessible. Can't make it stick if it takes couple of seconds to pull it off.
1.1. Goal
The goal is to be able to do the following:
Toggle my microphone (actual one) with a keybind so that I can talk with others
I suppose you can make it hold-to-communicate, but it felt like a bit too much work.
- Play from a predefined set of sound effects with keybinds
2. Requirements
- PulseAudio (or PulseAudio on Pipewire)
- (Optional) SoX, which can be used in place of
paplayused later. It has more options when it comes to playing sounds, such as loops. - (Optional)
qpwgraph, an excellent visualiser of the sound source/sink relationship. I used this to generate the images below. You can also do this withqpwgraph, but I opted to not do this to maximise script compatibility.
3. Setting it up
To implement this, we need a way to combine two sound sources: My microphone and the sound effects. The combined sound will be passed onto ARC Raiders so that both can be heard without having to switch things mid-game.
3.1. Original State ATTACH
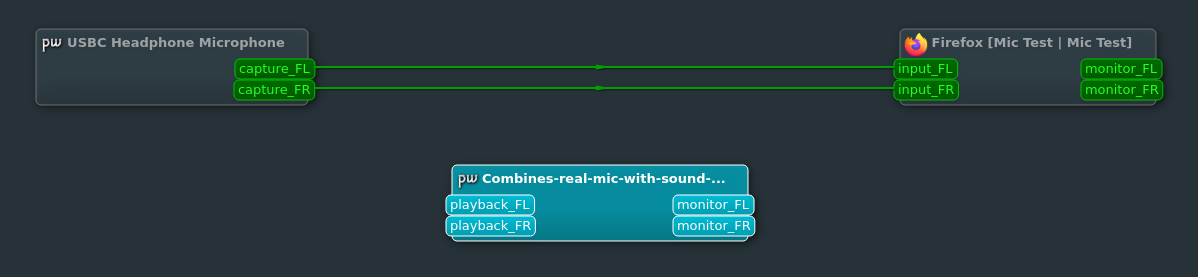
I visited a microphone test website, and let it record sound from my microphone. The setup is visualised as follows:

As you can see, my microphone is directly connected to the Firefox's microphone test page.
3.2. Creating A New Device ATTACH
The following command creates a new sink. Note that you cannot use spaces even with quotes in the description.
[main@main:~]$ pactl load-module module-null-sink sink_name=Combined sink_properties=device.description="Combines-real-mic-with-sound-effects"
536870916
Now you should see this device coming up on qpwgraph.
If at any point you mess up the process and want to undo it, remember the number you received when you entered the command, and use the following command to undo it.
pactl unload-module 536870916
3.3. Connecting My Microphone To This Sink ATTACH
Now we need this sink to get my microphone's input. Before that, we need to know the name of our microphone.
[main@main:~]$ pactl info
Server String: /run/user/1000/pulse/native
Library Protocol Version: 35
Server Protocol Version: 35
Is Local: yes
Client Index: 1303
Tile Size: 65472
User Name: main
Host Name: main
Server Name: PulseAudio (on PipeWire 1.4.9)
Server Version: 15.0.0
Default Sample Specification: float32le 2ch 48000Hz
Default Channel Map: front-left,front-right
Default Sink: alsa_output.usb-Samsung_Samsung_USB_C_Earphones_20160406.1-00.analog-stereo
Default Source: alsa_input.usb-Samsung_Samsung_USB_C_Earphones_20160406.1-00.analog-stereo
Cookie: c099:d8ac
The sink in this context means the "exit" of the sound data. Usually that's your speaker. In a similar vein, your microphone is a "source" of the sound data. The default source is the default microphone, and next to it is the name of that microphone. In this case, the source we will use is alsa_input.usb-Samsung_Samsung_USB_C_Earphones_20160406.1-00.analog-stereo.
If you know that's not the microphone you're looking for, you can use the following command to list all the sources.
[main@main:~]$ pactl list sources | grep Name
      Name: alsa_output.usb-Samsung_Samsung_USB_C_Earphones_20160406.1-00.analog-stereo.monitor
      Name: alsa_input.usb-Samsung_Samsung_USB_C_Earphones_20160406.1-00.analog-stereo
      Name: alsa_output.pci-0000_00_1f.3.analog-stereo.monitor
      Name: alsa_input.pci-0000_00_1f.3.analog-stereo
      Name: Combined.monitor
The device we have created earlier is technically a source too, which is why it is listed here.
Now that we know the name of our device, we will connect the microphone to it.
[main@main:~]$ pactl load-module module-loopback source=alsa_input.usb-Samsung_Samsung_USB_C_Earphones_20160406.1-00.analog-stereo sink=Combined
536870917
This creates two new devices and creates more connections. While it looks disconnected, both are with the same name, and you can see how the output of the microphone is eventually going into our combining device.
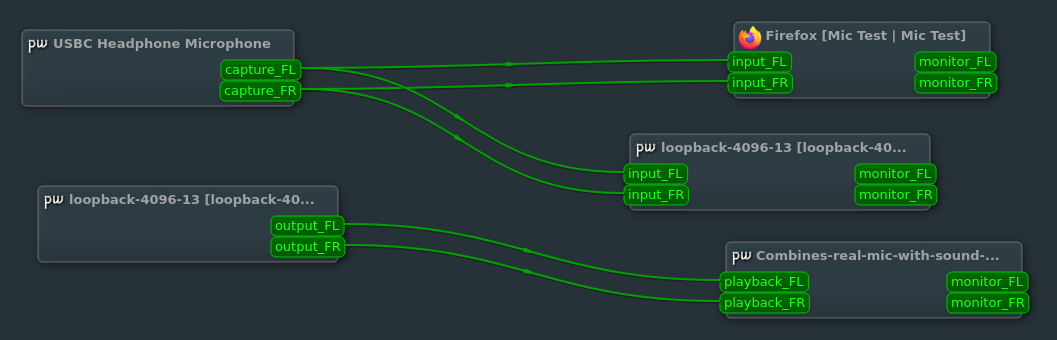
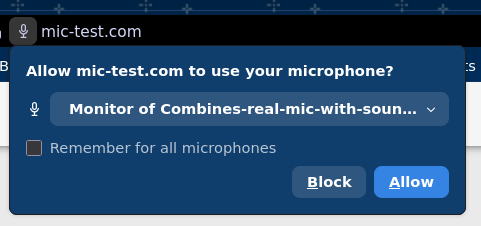
You can test this by going to any microphone test site, and choosing the microphone we have previously created.
3.4. Playing Files Into The Sink ATTACH
We are going to test our setup by playing a file into the microphone.
paplay --device=Combined ./YaketySaxLoop.mp3
The terminal will play the music in the foreground. Meanwhile, qpwgraph will show the following:
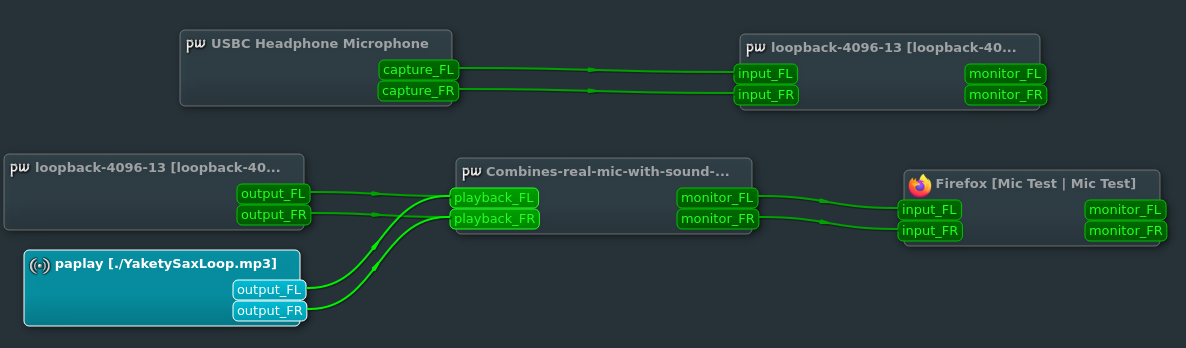
You can see how a new player named paplay is added, and is playing to Combined alongside our microphone, and the result is being sent to Firefox. If you record the sound now, you will hear both your voice and the song!
You may find the song to be too loud and overwhelm your voice. In that case, you can lower the volume of the music with the following command. paplay accepts an argument named --volume, and its range is between 0 and 65536, 65536 being the loudest, of course.
paplay --volume 40000 ./YaketySaxLoop.mp3
3.5. Disabling Your Microphone
However, this setup would require you to keep your microphone on all the time. That's not particularly desirable. While it is possible to have it hold-to-talk, we will keep it simple and make it toggleable.
First, we need to be able to control the volume itself. The following command can do this.
pactl set-source-volume alsa_input.usb-Samsung_Samsung_USB_C_Earphones_20160406.1-00.analog-stereo 0%
Swap out the 0% with 100%, and your microphone will be back on.
Next, we need to be able to check our volume so that we know which value we need to use.
[main@main:~/Downloads]$ pactl set-source-volume alsa_input.usb-Samsung_Samsung_USB_C_Earphones_20160406.1-00.analog-stereo 50%

[main@main:~/Downloads]$ pactl get-source-volume alsa_input.usb-Samsung_Samsung_USB_C_Earphones_20160406.1-00.analog-stereo
Volume: front-left: 32768 /  50% / -18.06 dB,   front-right: 32768 /  50% / -18.06 dB
      balance 0.00
We can extract that 50% to check the current volume.
Combining these two together, we can create a script that does the following:
- Get the current microphone volume
- If the volume is non-zero, set the microphone volume to 0%
- If the volume is zero, set it to 100%
The entire script is as follows:
dev=alsa_input.usb-Samsung_Samsung_USB_C_Earphones_20160406.1-00.analog-stereo
vol=$(pactl get-source-volume $dev | grep -o '[0-9]\+%' | head -n1 | tr -d '%')

if [ "$vol" -eq 0 ]; then
    pactl set-source-volume $dev 100%
else
    pactl set-source-volume $dev 0%
fi
4. Combining It All Together
Now we are done! We just need to bind these to a keybind to get it working. My personal choice is wlr-which-key.
4.1. Setup Script
src=alsa_input.usb-Samsung_Samsung_USB_C_Earphones_20160406.1-00.analog-stereo; # Sets the microphone name
pactl load-module module-null-sink sink_name=Combined sink_properties=device.description="Combines-real-mic-with-sound-effects"; # Create a virtual device
pactl load-module module-loopback source=$src sink=Combined; # Make microphone play sound into the virtual device
4.2. Toggle Microphone Script
dev=alsa_input.usb-Samsung_Samsung_USB_C_Earphones_20160406.1-00.analog-stereo
vol=$(pactl get-source-volume $dev | grep -o '[0-9]\+%' | head -n1 | tr -d '%')

if [ "$vol" -eq 0 ]; then
    pactl set-source-volume $dev 100%
else
    pactl set-source-volume $dev 0%
fi
4.3. Play Sound Script
# Optionally add "pkill paplay" so that sound can never overlap
paplay --device=Combined --volume 30000 <Path to the file you want to play>
# Optionally repeat the same command but without the --device flag so you know what's being played in the microphone
4.4. Kill All Sound Being Played
pkill paplay # I mean, it's simple
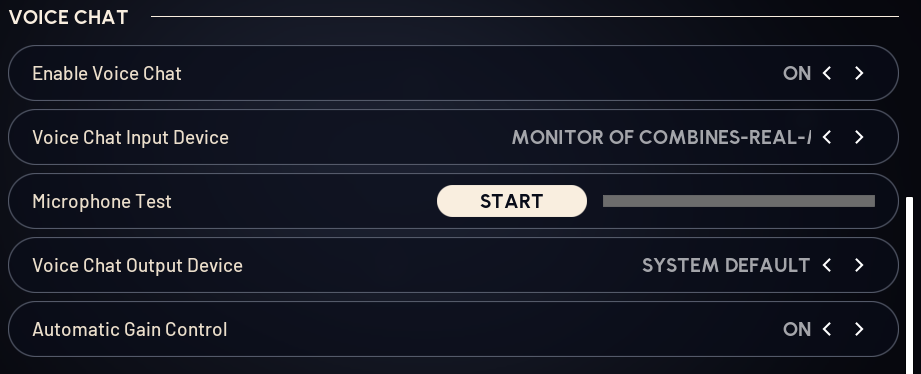
4.5. ARC Raiders Setup ATTACH
This one isn't too hard. We just need to select the device we created above as our microphone. Since the microphone is controlled by our toggle script, we can set it as open microphone, or toggle. Of course, when the microphone is disabled in-game, it will disable both your real microphone and the sound you are playing into your microphone. One annoying thing is that you need to create the device before launching Steam, or the device won't appear in the list.
4.6. Using sox Instead
One issue with paplay was that there was seemingly no way to make the track loop without using while loop, but then it's hard to make it stop. sox has a command named play, and it comes with the ability to loop the track.
AUDIODEV=Combined play ./audio.mp3 repeat 1000 # Effectively infinite