Using KeepassXC As A Secret Storage For Simple Scripts
Table of Contents
1. Overview
Some of you may already know that KeepassXC can be used to store and serve passwords for other programs on your device. This option is called "Secret Service Integration". With this enabled, when a program tries to store a secret key (e.g. Your NextCloud Desktop credentials), it goes into your KeepassXC database instead. Similarly, when the program starts, it fetches the password from your database if it is unlocked. If not, you are prompted to unlock it.
Today, we will use this to write a simple script that fetches a password from the KeepassXC database via Secret Service, and use it to do some sensitive things.
2. Security Concerns
Obviously, you would have some concerns regarding this. Your KeepassXC database most likely contains all the important passwords, and it may not sound great that any program can technically query your database. Fortunately, you can limit the scope of the passwords to reveal. This limit is stored alongside your database file (and not in KeepassXC config itself), so it can't be modified without unlocking the database. As a result, a rogue program can't just scrape all of your passwords like this.
If you are still feeling paranoid, there's an option in KeepassXC that explicitly notifies you or requests permission whenever a program tries to access your database. Enabling that should make it very clear as to who is accessing your database.
3. Tools We Will Use
We will use the following tools for this:
- KeepassXC: For storing the passwords, of course
secret-tool: CLI tool that comes with the package that goes by the namelibsecret- GocryptFS: This program will use the password
4. Steps
4.1. Enabling Secret Service ATTACH
First, you need to enable a certain option in KeepassXC so that KeepassXC takes over the role of keeping secrets. Click on the gear icon, and then go to "Secret Service Integration". Then click on "Enable KeepassXC Freedesktop.org Secret Service integration".
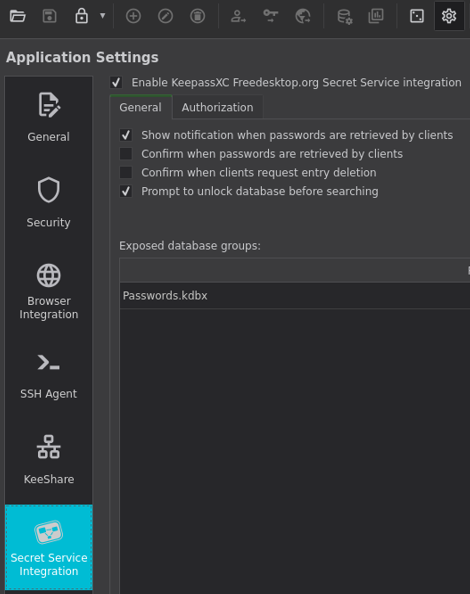
Note that you may need to disable existing secret service provider, which probably was either KWallet or gnome-keyring. For me, simply killing the service worked.
If the service does not kick in upon reboot, you might want to check out this comment on GitHub for a potential solution. What it essentially does is it sets KeepassXC as the default Secret Service provider.
4.2. Exposing A Directory ATTACH
Now that we have enabled the service, we need to select a directory to store secrets to, and load secrets from. To do that, find the database in the screenshot above, and then click on the pencil icon on the right. This should take you to the per-database settings page, where we can select the directory we will expose.
Going to "Secret Service Integration" menu, we can see two options at the top. Select "Expose entries under this group:", and then we can now select a group we are going to expose via secret service. Note that subdirectories are also exposed, so I recommend creating a dedicated directory for secret service.

One thing to remember is that this is option is stored alongside your database. If you are synchronising this database across multiple Linux devices, they will also end up with the same secrets. If you are setting up a dedicated account for each device and use KeepassXC synchronised across all the devices, this scheme will not work.
4.3. Testing secret-tool ATTACH
We are going to create a sample entry to see if the database exposing worked. Here is the command that creates an entry at the exposed directory. The --label part specifies the name of the entry.
secret-tool store --label="TEST ENTRY"
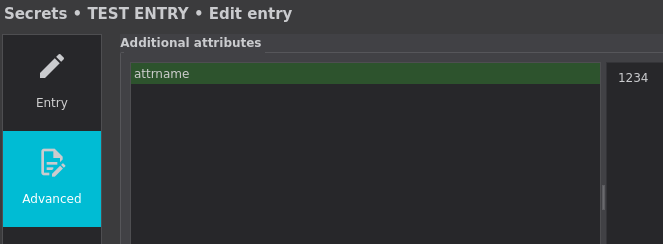
You should be prompted to enter the password. This password is not the password for your KeepassXC database, but the password to store in your database (assuming the database was already unlocked). You can also add certain attributes to the secrets to store by adding them to the end of the command. There are some special attributes, but most are simply stored under "Advanced" tab. For example, this command creates an entry that looks like this:
secret-tool store --label="TEST ENTRY" attrname 1234
4.4. Fetching Secrets
Now that we verified that we can store secrets in our KeepassXC database using secret-tool, now we just have to fetch them. Remember how we set attrname to 1234? We will use that to fetch the secret.
[nix-shell:~]$ secret-tool lookup attrname 1234
sdffsdgf
You can see the password we have saved in the terminal. This is how you fetch the secrets from the database. You can also use other attributes, such as the entry's path, UUID, title and more. To see all of the attributes of an entry, use the same command, except instead of lookup, use search. You can also use the flag --all to list all entries that matches the given search query.
[nix-shell:~]$ secret-tool search attrname 1234
[/12bd24bdf7a347d1ac3cd6c02c0d53a9]
label = TEST ENTRY
secret = sdffsdgf
created = 2025-10-06 00:12:38
modified = 2025-10-06 00:17:54
attribute.Title = TEST ENTRY
attribute.URL =
attribute.UserName = asd
attribute.Path = /TEST ENTRY
attribute.Uuid = 12bd24bdf7a347d1ac3cd6c02c0d53a9
attribute.Notes =
attribute.attrname = 1234
As you can see, the attribute.* has all of the attributes related to the entry, including the one we have set. There are also other attributes, which are automatically created, such as Path, which represents the directory (or group, in KeepassXC's terminology) the entry is in. Of course, we can use that to specify the entry we want to see.
[nix-shell:~]$ secret-tool lookup Path "/Scripts/TEST ENTRY"
sdffsdgf
This works even if they are in subdirectories, though for some reasons, fetching the secrets did not work for the first time if they are in a folder. After fetching them via Path attribute (which sometimes makes KeepassXC to crash), everything works. I can no longer reproduce it so I don't know why.
4.5. Writing Useful Script (Unlock GocryptFS) ATTACH
My personal use of this feature is to keep my cryptographic material I frequently use encrypted in a GocryptFS directory, and binding a key to a command that unlocks it. The program then fetches the password from my KeepassXC database (or ask me to unlock it if it isn't already), and mounts it. We are going to do that. This process is incremental, and I will explain my script step by step.
Before everything, I will create my secret directory at ~/Sync/Secrets.
[main@main:~/Sync]$ mkdir Secrets

[main@main:~/Sync]$ gocryptfs -init Secrets
Choose a password for protecting your files.
Password:
Repeat:

Your master key is:

    ********-********-********-********-
    ********-********-********-********

If the gocryptfs.conf file becomes corrupted or you ever forget your password,
there is only one hope for recovery: The master key. Print it to a piece of
paper and store it in a drawer. This message is only printed once.
The gocryptfs filesystem has been created successfully.
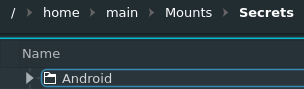
I will mount my directory in ~/Mounts/Secrets/. Then I must ensure that this directory exists before I mount it. This command would create the directory I need.
mkdir -p ~/Mounts/Secrets;
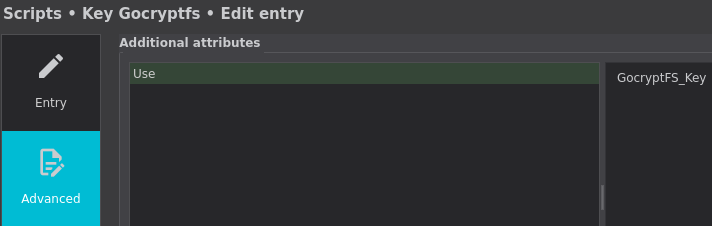
I have added an attribute with the name Use and its value set to GocryptFS_Key. Remember, this is set in Advanced tab in KeepassXC's entry edit menu.
Now we need to test if we can get this from KeepassXC.
[nix-shell:~/Sync]$ secret-tool lookup Use GocryptFS_Key
<GocryptFS password should appear here>
Now that we verified it works, we need to supply this to gocryptfs. Thankfully, they have an entry called -extpass, which instead of asking the user for password directly, it runs a program to fetch the password. That is perfect for our use.
gocryptfs -extpass 'secret-tool lookup Use GocryptFS_Key' ~/Sync/Secrets ~/Mounts/Secrets
Finally, I want to be notified on how it goes in case I need to debug this. After all, if I have this bound to a key, I would not know what went wrong in case it doesn't work. I will use notify-send, which is a tool you can use in command line to send a notification. It takes in two parameters; First one is the title of the notification, and the second one is the detail part of the notification. Anything can go in there, so I will set the title to "GocryptFS" and set the detail as the command result.
notify-desktop GocryptFS "$(gocryptfs -extpass 'secret-tool lookup Use GocryptFS_Key' ~/Sync/Secrets ~/Mounts/Secrets)";
The entire script is as follows:
mkdir -p ~/Mounts/Secrets;
notify-desktop GocryptFS "$(gocryptfs -extpass 'secret-tool lookup Use GocryptFS_Key' ~/Sync/Secrets ~/Mounts/Secrets)";
With this, I can unlock my secret files conveniently! I found using files in KeepassXC database to be rather clunky because I can't just access them directly, but also I need to copy-and-paste the password from KeepassXC database to unlock my files, which is rather annoying. This covers both downsides.